
⏱ Reading time: 7 minutes
I killed my first cast-iron pan. Bought it brand new, used it twice, left it wet in the sink overnight, and woke up to a rust-coloured disaster. I scrubbed it with steel wool, which stripped whatever factory seasoning was there, and then I did not know what to do next. So I gave up. The pan remained in a cabinet for two years before I ultimately disposed of it, which was a complete waste.
The second time around, I did my homework. I learned that seasoning is not something you do once and forget. It is a relationship. You build it up slowly and maintain it, and the pan rewards you with a nonstick surface that lasts for generations. My current cast iron skillet is ten years old now. It is smoother than most nonstick pans I have owned. Eggs slide around like they are greased glass. All because I stopped treating seasoning like a chore and started treating it like a habit.
This guide covers everything I wish I had known from the start. How to season from scratch. How to maintain what you have. How to fix rust when you mess up. And how to stop worrying so much about the whole thing, because honestly, cast iron is tougher than the internet makes it seem.
What Seasoning Actually Is
Seasoning is not flavour. It is not salt and pepper. It is a thin layer of polymerised oil baked onto the surface of the pan. When oil is heated past its smoke point, it breaks down and bonds with the iron, creating a durable smooth, nonstick coating. Do this enough times and the coating builds up into a durable, black patina.
This patina is what makes cast iron so special. It is naturally nonstick without chemicals. It protects the iron from rust. And it improves better with age. A well-seasoned pan is truly beautiful. A poorly seasoned pan is a sticky, rusty headache.
The positive news is that seasoning is not fragile. You can scratch it, scrub it, and abuse it, and it will come back. The only real enemy is prolonged moisture. Water, plus iron, plus time equals rust. Everything else is fixable.
What You Need to Get Started
The list is short. A cast iron pan. Some oil. An oven. That is literally it. You do not need flaxseed oil, despite what the forums say. You do not need beeswax. You do not need to sand your pan down to bare metal as if you were some kind of maniac.
For oil, use something with a high smoke point and a neutral flavour. Vegetable oil, canola oil, grapeseed oil, or plain old Crisco all work fine. I use canola because it is cheap and I always have it. Flaxseed oil creates a brittle seasoning but it flakes over time. Although avocado oil is effective, its high cost does not justify the benefits. Save your fancy oils for salad.
You also need a paper towel or clean cloth, some aluminium foil, and an oven that can hold 450 to 500 degrees. That is the whole toolkit.
| Oil Type | Smoke Point | Pros | Cons |
|---|---|---|---|
| Canola / Vegetable | 400-450°F | Cheap, available, works great | Nothing significant |
| Crisco (Shortening) | 490°F | Traditional choice, builds durable seasoning | Messy to apply, hydrogenated |
| Grapeseed | 420°F | Neutral flavor, decent smoke point | More expensive than canola |
| Flaxseed | 225°F | Creates very hard initial layer | Flakes over time, expensive, low smoke point |
| Avocado | 520°F | Very high smoke point | Expensive, unnecessary for seasoning |
The Oven Method: Step by Step
This technique is the most reliable way to build seasoning from scratch or restore a neglected pan. It takes time but requires almost no attention.
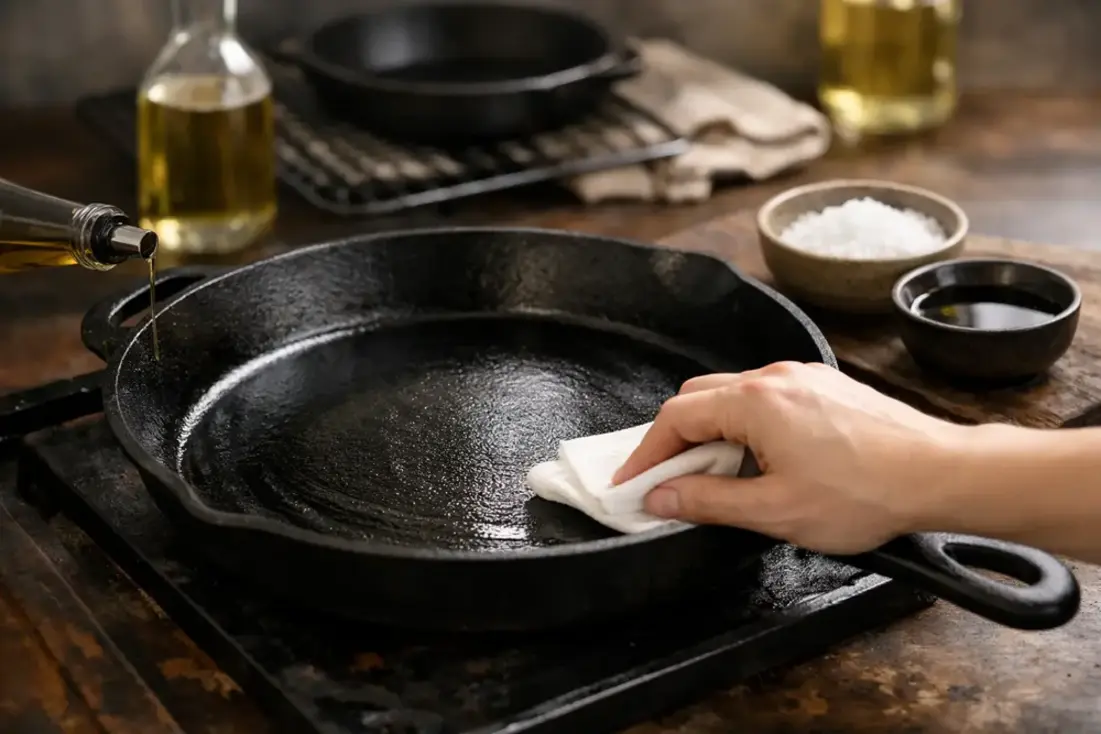
Preheat your oven to 450 degrees. Wash the pan with hot water and a little soap if it is dirty. Dry it completely. I mean completely. Water spots become rust spots. I dry mine on the stove over low heat for a minute to be sure.
Pour a teaspoon of oil into the pan. Use a paper towel to rub it over every surface — inside, outside, handle, everywhere. Then — this is crucial — use a clean paper towel to wipe off almost all of it. The pan should look barely oily, with no pools or drips. Too much oil creates sticky, uneven seasoning. Thin layers are the secret.
Place the pan upside down on the middle oven rack. Put a sheet of aluminium foil on the rack below to catch any drips. Bake for one hour. Turn off the oven and let the pan cool inside completely. Do not rush the process. Opening a hot oven to grab the pan interrupts the polymerisation process.
Repeat this process three to five times for a new pan or a stripped one. Each layer builds on the last. You will know it is working when the pan turns from grey to dark brown to black. The surface will feel smoother. Food will start to release more easily.
The Thin Layer Rule: If your seasoning comes out sticky or blotchy, you used too much oil. This is the number one mistake. Wipe it like you are trying to remove all the oil. There should be very little left on the surface. A whisper of oil is enough. Trust the process.
The Stovetop Method: For Maintenance
Once your pan has a base seasoning, you do not need the oven every time. The stovetop method is faster and perfect for touch-ups after cooking.
After cooking, wash the pan with hot water and a brush or non-abrasive scrubber. Dry it thoroughly on the stove over medium-low heat. When it is completely dry, add a few drops of oil. Rub it around with a paper towel until the pan looks almost dry again. Keep the pan on the heat for another minute or two until it smokes lightly. Turn off the heat. Let it cool. Done.
This takes three minutes and maintains your seasoning every time you cook. I do it almost every time I use my pan. It is not a big production. It is just a habit, like washing your hands after handling raw chicken.
Cleaning Without Stripping
Here is where people get weird about cast iron. They think you cannot use soap. They think you cannot scrub. They think you have to be very careful with the seasoning, or it will disappear. None of these assumptions is true.
Modern dish soap is mild. It will not strip a mature seasoning. It might affect a brand new, barely-there layer, but even then, a quick stovetop touch-up fixes it. I use soap on my ten-year-old pan all the time. It is fine.
What you should avoid is prolonged soaking. Do not leave cast iron in a sink full of water. Do not put it in the dishwasher. Do not let it air dry. These are the things that cause rust, not soap.
For stuck-on food, use a chainmail scrubber or a stiff brush. Kosher salt and a paper towel work as a gentle abrasive for light cleaning. For really stubborn stuff, simmer water in the pan for a few minutes to loosen it, then scrape and wash. The seasoning can handle it.
| Cleaning Method | When to Use It | Safe for Seasoning? |
|---|---|---|
| Hot water and mild soap | Everyday cleaning | Yes, on mature seasoning |
| Chainmail scrubber | Stuck-on food | Yes |
| Kosher salt abrasive | Light scrubbing without water | Yes |
| Simmering water | Really stubborn residue | Yes, if you dry and re-oil after |
| Steel wool or heavy abrasive | Stripping to re-season | No — this removes seasoning |
| Dishwasher | Never | No — strips and rusts |
Fixing Rust: It Is Not the End
Rust happens. You forget to dry the pan. You leave it in a humid place. Someone else uses it and does not know the rules. Whatever. Rust is surface-level and fixable unless you have let it go for months.
For light rust, scrub the affected area with steel wool or a stiff brush until the rust is gone and you see bare metal. Wash with soap and water. Dry completely. Then re-season using the oven method for two or three cycles. The pan will be fine.
For heavy rust, you might need to strip the whole pan and start over. A vinegar bath helps — mix equal parts white vinegar and water, submerge the pan for a few hours, and then scrub. The acid dissolves the rust. Do not leave it too long or the vinegar will eat the iron itself.
After stripping, wash, dry thoroughly, and re-season from scratch. It sounds dramatic but it really is not. A few hours of work and you have a brand new pan. I have done this process twice. Both pans are still working well.
The Vinegar Warning: Never soak cast iron in vinegar overnight. The acid will pit the surface and create permanent damage. A few hours is plenty. Check it every hour. When the rust wipes off easily, pull it out and scrub. Better to repeat a short soak than to ruin the pan with one long one.
Cooking in Cast Iron: What Works and What Does Not
Not every dish belongs in cast iron. Acidic foods like tomatoes, wine sauces, and citrus can strip seasoning, especially on a new pan. A quick tomato sauce in a well-seasoned skillet is fine. A long-simmered Bolognese in a barely seasoned one will leave you with metallic-tasting food and a damaged surface.
Delicate fish can stick even in a well-seasoned pan. Eggs are the ultimate test — if your pan is ready, they slide. If not, they glue. Do not get discouraged if eggs stick at first. Keep cooking, keep maintaining, and eventually they will be released.
What cast iron does better than almost anything else is high-heat searing. Steaks. Pork chops. Chicken thighs. The mass of the pan holds heat, creating a crust that thinner pans cannot match. Cornbread bakes beautifully in cast iron, with a crispy edge that is basically iconic. Roasted vegetables become caramelised and charred in ways that sheet pans struggle to replicate.
The Daily Habit That Changes Everything
If you take one thing from this article, make it your habit: dry and oil your pan after every use. Every single time. No exceptions.
Wash it. Dry it on the stove. Rub a few drops of oil around. Let it smoke lightly. Turn off the heat. Walk away. Three minutes total. Do this exercise for a month and your pan will transform. Do it for a year and it will be better than any nonstick you have ever owned.
This habit is what separates people who love their cast iron from those who have given up on it. The pan does not ask for much. Just a little attention after each use. In return, it gives you a cooking surface that improves with age instead of degrading.
Myths to Ignore
The internet loves to argue about cast iron. Here are the myths I see repeated constantly that you can safely ignore.
Myth: You can never use soap. False. Mild soap is fine on a mature seasoning. It was true when soap contained lye, which did strip seasoning. Modern dish soap does not.
Myth: You need to season after every single use. Overkill. A stovetop oil-and-heat touch-up maintains seasoning. Full oven seasoning is only needed for new pans, stripped pans, or touch-ups after damage.
Myth: Bacon is the best way to season a pan. Bacon fat works, but it is not magic. And bacon often contains sugar, which can create a sticky, uneven coating. Regular oil is more reliable.
Myth: You should never cook acidic foods. Exaggerated. Well-seasoned pans handle brief acidic cooking just fine. Just do not simmer tomato sauce for three hours in a brand new skillet.
Myth: Cast iron heats evenly. Actually, it heats unevenly. It holds heat beautifully, which is a notable difference. The mass of the pan retains temperature when you add cold food. But it develops hot spots just like any other pan. Preheat it slowly to minimise these effects.
Buying Your First Pan (or Your Next One)
If you are starting from scratch, a 10 or 12-inch skillet is the most versatile choice. Lodge is the standard recommendation — made in America, preseasoned, affordable, and bulletproof. You can find them at any hardware store or online for around twenty to thirty dollars.
Vintage cast iron is a fascinating rabbit hole if you get into it. Griswold and Wagner pans from the early 1900s have smoother surfaces than modern ones because they were polished after casting. They are collectible and cook beautifully. But they are not necessary. A new Lodge, properly seasoned and maintained, will cook just as well.
Do not buy enamelled cast iron if you want the seasoning experience. Enamelled pans — Le Creuset, Staub — have a glass coating that prevents rust and does not require seasoning. They are particularly well-suited for braising and baking but they are a different product entirely. This article is about bare cast iron.
Final Thoughts
Cast iron is not fussy. It is not fragile. It does not require special oils or sacred rituals. It requires two things: keeping it dry and cooking in it often. Everything else is details.
My pan has been through phases. Neglected and rusty. Over-seasoned and sticky. Properly maintained and glorious. It has cooked hundreds of meals. It has been dropped, scratched, and overheated. It always comes back. That is the thing about cast iron. It forgives.
Start with one pan. Season it properly. Cook in it regularly. Dry it and oil it after each use. Do not stress about perfection. In six months, you will have a pan that performs better than anything you can buy new. In ten years, you will possess something that is worth passing down. That is the whole point.
Related Articles
- The Only 5 Pots and Pans You Need to Start Cooking
- Simple Techniques That Improve Cooking Results
- Everyday Kitchen Tricks That Actually Help
References and Sources
- Lodge Cast Iron. (2025). Care and Seasoning Instructions. Retrieved from lodgemfg.com
- Serious Eats. (2025). The Truth About Cast Iron Pans: Myths That Need to Go Away. Retrieved from seriouseats.com
- America’s Test Kitchen. (2024). The Best Way to Season Cast Iron. Retrieved from americastestkitchen.com